Hi there, 3Ds Max is no doubt a very useful software for the fields like architecture, interior, civil, gaming, animation, etc. No matter how detailed your design is; it won’t give a nice look if it is not rendered properly. In order to take out a photo realistic scene, there is a need for high-quality rendering which takes lot of time certainly. But yes it is also true that we all need to do fast rendering with high quality since no one want to waste their time in rendering. Let’s find out the ways to do fast rendering in 3Ds Max with V-ray that should look photo realistic.

This blog is written as per the perspective of exterior and interior designs. There are many methods that can reduce the rendering time. Let’s take a look at them in detail.
Tips for fast rendering in 3Ds Max with V-Ray
1. Proxy – Generally we use lots of downloaded products like, trees, vehicles, humans, curtains, plants, etc. This increases lot of polys which further increase the time to render the files. To deal with this problem using proxy is very useful. If you check render without Proxy, your render file increases extra time for sure.
Here is an example of huge polys without proxy.

- Total values are:
- Polys: 14,754,153
- Verts: 12,544,780
- FPS: 0.04
And after using proxy, you can see a big difference in the total of polys that will result in fast rendering in 3ds Max.

- Difference in the values:
- Polys: 130,762
- Verts: 103,334
- FPS: 0.61
How to use Proxy – It is very simple, just need to follow given steps.
First you need to select your product, then right click and select V-Ray Mesh export option as shown in the image.

Then pick up few options –
- Select Correct Folder
- Export each selected object in a separate file
- Automatically create proxies
- Max preview faces – (you can set 5000 to 10000) according to preview

After completing these steps, you will see a big difference. If you are thinking that after using proxy your objects will spoil or useless then you need to be worried since according to my own working experience your object will be safe. I am going to share few before and after screen shots below.

So there is no big difference in rendering but you can see a huge difference in polys.
2. Render – Though there are many options available for rendering that you can use for instance Mental Ray, Arnold, Corona, and V-ray but today I’ll talk about V-Ray. V-Ray is the best rendering option according to me and most of the professionals.
About V-Ray – V-Ray by Chaos Group comes in a form of powerful rendering engine that works with lots of complex aspects like Global illumination algorithms, irradiance maps and photon mapping in order to perform.
Please note: To experience better and fast rendering in 3ds Max, it is always recommended to use V-Ray textures, V-Ray lights and camera.
Let’s talk about rendering process in V-ray. Follow the below given steps:
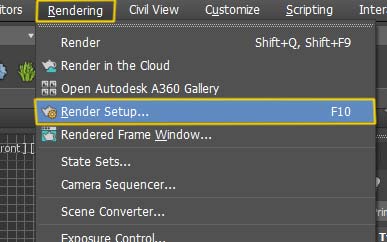
Open V-Ray render pallet; go to Rendering (from menu bar) then click on “Render Setup” option. You can also use F10 as short cut key.
Now here, you will see lots of options, no need to fret. Start with the tabs. First go to “Common Tab” and under Output Size select HDTV (Video) and set width and height. I’m using 1920 x 1080 values but you are free to set according to own requirement.

Now jump to next tab i.e. V-Ray. Here you need to make sure to enable both options in Frame Buffer as shown in the image.

After finishing with Frame Buffer, go for Image Sampler (Antialiasing) which has two options – Bucket and Progressive.
- The ‘Bucket’ image sampler renders the image in rectangular regions (buckets), while the ‘Progressive’ sampler works on the whole image at once.
- The bucket samplers is more RAM-efficient and may work better for distributed rendering.
- The progressive sampler is useful to get quick feedback for the entire image, to render an image with a specific period of time, or to let the render run until the image is good enough.
So here I’m going to use Bucket Sampler. Use the settings as it is as shown in the image given below.

This sampler multiplies the samples per pixel according to the intensity differences between pixel and its neighbours.
Let’s get to know about the other options.
Min Subdivs – It controls the minimum no of samples per pixel. Normally a value of 1 works fine, however raising this to 2 or 3 will allow for better initial detection of thin geometry and small specular under challenging conditions that would otherwise lead to bucket artifacts (e.g. extreme dof/motion blur or difficult GI situations).
Max Subdivs – It controls the maximum no of samples per pixel. Set this to a high value like 100 for the “universal” workflow where you can use the Min shading rate and the Noise threshold to control image quality. This will insure early raycasting termination if needed.
Noise Threshold – It controls when to stop the adaptive sampling for the pixels. Lower values produce less noise and a better quality image at the expense of render time.
Now our next step is GI (Global illumination). Make sure to enable GI and also we have two types of engines here which are Primary and Secondary.
I would like to suggest you to choose Irradiance map from Primary engine and Light cache from Secondary engine.

- Primary Engine – We use this option since it affects the primary diffuse bounces. Do you know what is it? A primary bounce can occur if there is a shaded point which can be seen by the camera clearly.
- Secondary Engine – We use this option for secondary diffuse bounces that can occur if there is a shaded point in GI calculations.
Now let’s move on to the next setting that is Irradiance map –
First look for current preset.
You can choose from several presets and they are useful in quickly setting up the color, min and max rate along with the normal and distance thresholds.
One important thing to note here is size. The presets can be used for an image with 640×480 dimensions.
For larger images, we can go for alterations in min and max rates.
Have a look at the list of available presets:
- Very low – It is useful to check the general lighting in scenes.
- Low – It is only for preview purpose.
- Medium – This preset can be used if the scene doesn’t have small details.
- Medium animation – Distance threshold is higher in it and mainly useful in reducing flickering in animations
- High – Whether there is some animation or small details, this preset works in most of the situations.
- High animation – If in case the high preset gives flickering in animations then this can be used.
- Very High – It is the most high quality preset and is capable to work with extremely small and intricate details.


Subdivs – It controls the quality of the light cache. The default 1000 is a good starting point; set it to larger values like 3000 for more complicated interior renders and reduce flickering in animations.
So, make sure to apply these settings in a right way while working in your project.
Next is Render Element. There are lots of Render Elements for different purposes. I will go for VRayDenoiser since it is capable of detecting the areas having noise.

Then go to VRayDenoiser Parameters and select Denoising engine.
Choose NVIDIA AI denoiser. Basically the default V-Ray denoiser is slower, but may be more accurate and can denoise multiple render elements.
The NVIDIA AI denoiser on the other hand is very fast, but probably less accurate and only denoises the RGB channel.
Please note that The NVIDIA AI denoiser needs a compatible NIDIA GPU.

That’s all for today, we’ve gone through many settings that you can follow to reduce your time and switch to better and fast rendering in 3Ds Max with the help of V-ray.
Interested in learning 3Ds Max with V-ray?
We got a complete course for you that is covering up all the core concepts of not only rendering but also lighting, texturing, and camera. So, kick start your 3Ds Max training with our experts. Here is the list of our important courses:
- 3Ds Max Master Course – 3 Months
- 3Ds Max Standard Course – 1.5 Months
- V-ray Master Course – 1 Month
For detailed inquiry, just contact us or ring us at 9811818122.


